ARTS #010
ARTS #010
ARTS is an activity initiated by
由左耳朵耗子--陈皓: Do at least one leetcode algorithm question every week, read and comment on at least one English technical article, learn at least one technical skill, and share an article with opinions and thoughts. (That is, Algorithm, Review, Tip, and Share are referred to as ARTS) and persist for at least one year.
ARTS 010
This is article 10
Algorihm algorithm question
I did two algorithm questions this week
Question 1
leetcode algorithm question 767.Reorganize String: Difficulty: Moderate
Given a string S, check if the letters can be rearranged so that two characters that are adjacent to each other are not the same.

If possible, output any possible result.  If not possible, return the empty string.

Example 1:

Input: S = "aab"
Output: "aba"
Example 2:

Input: S = "aaab"
Output: ""
Note:

S will consist of lowercase letters and have length in range [1, 500].
My idea of solving the problem, the first thing I thought of was that if the number of a certain letter exceeds half the length of S, then “” must be returned. The question requires only lowercase letters, so I thought of first calculating the number of each character in the string S, and then I thought of sorting by the number of characters. Finally, I had to consider some boundary conditions, time complexity and space complexity. The specific implementation is as follows. The running time of LeetCode is 0ms and the time complexity is O(n).
char* reorganizeString(char* S) {
    int len = strlen(S);

    //计算S中每个字母的个数
    //Calculate the number of  letters in S
    int* charCount = (int*)malloc(sizeof(int) * 26);
    memset(charCount, 0, sizeof(int) * 26);
    for (int i = 0; i < len; i++) {
        int index = S[i] - 97;
        charCount[index]++;
    }

    //如果某一个字母的个数超过S长度的一半,直接返回""
    //If the number of letters is more than half the length of S, directly return  ""
    for (int i = 0; i < 26; i++) {
        int index  = charCount[i];
        if (index > len/2 + len%2) {
            return "";
        }
    }


    //"排序",这里的排序是按字母的个数排序,字母多的放到前面。比如S="dddbbbbffkkkkkk",那么排序后的orderS是"kkkkkkbbbbdddff"
    //"sorting",The sorting here is sorted by the number of letters, and put the more letters in front,eg:if S="dddbbbbffkkkkkk",so orderS is "kkkkkkbbbbdddff"
    char * orderS = (char*)malloc(sizeof(char*) * len);
    int count = 0;
    for (int i = 0; i < 26; i++) {
        int  sortingNum = charCount[i];
        int maxIndex = i;
        for (int j =0; j < 26; j++) {
            if (sortingNum < charCount[j] ) {
                sortingNum = charCount[j];
                maxIndex = j;
            }
        }
        for (int j = 0; j < sortingNum; j++) {
            orderS[count++] = maxIndex + 97;
        }
        charCount[maxIndex] = 0;
    }

    //打乱顺序 比如orderS是'bbbc ccdd',打乱后就是bcbcbdcd
    //reorganizeString eg: orderS is 'bbbc ccdd', reorganizeString is bcbcbdcd
    int max = len/2;
    int mid = max+ len%2;
    for (int i =0; i < max; i++) {
        S[2*i] =orderS[i];
        S[2*i+1] =orderS[mid+i];
    }
    if (len%2) {
        S[len -1] = orderS[max];
    }
    free(orderS);
    free(charCount);

    return S;
}
Question 2
leetcode algorithm question 541.Reverse String II: Difficulty: Easy
Given a string and an integer k, you need to reverse the first k characters for every 2k characters counting from the start of the string. If there are less than k characters left, reverse all of them. If there are less than 2k but greater than or equal to k characters, then reverse the first k characters and left the other as original.
Example:
Input: s = "abcdefg", k = 2
Output: "bacdfeg"
Restrictions:
The string consists of lower English letters only.
Length of the given string and k will in the range [1, 10000]
This question is relatively simple, just consider a few more situations.
void ReverseString(char* str,int min,int max) {
    int i = min;
    int j = max;
    while (i < j) {
        char temp = * (str + i);
        * (str + i) = * (str + j);
        * (str + j)  = temp;

        i++;
        j--;
    }
}

char* reverseStr(char* s, int k) {
    u_long strlength =  strlen(s);
    if ( k == 0) {
        ReverseString(s,0,strlength-1);

    }
    else {
        u_long count = strlength/(2*k);
        for (int i = 0; i < count; i++) {
            ReverseString(s,(2*k)*i,(2*k)*i + k-1);
        }
        u_long count_1 = strlength%(2*k);
        if (count_1 > 0) {
            if(count_1<k){//剩余少于 k 个字符
                ReverseString(s,strlength- count_1,strlength -1);
            }
            else{//小于 2k 但大于或等于 k 个字符
                ReverseString(s,strlength- count_1,strlength- count_1  + k -1);
            }
        }
    }
    return s;
}
Review
This article comes from: https://medium.freecodecamp.org/how-to-become-a-git-expert-e7c38bf54826
How to become a Git expert How to become a Git expert
 “time-lapse photography of man standing beside road and bridge during daytime” by Ahsan Avi on Unsplash
Time-lapse photography of people standing on the roadside and bridge during the day by Ahsan Avi on Unsplash
“time-lapse photography of man standing beside road and bridge during daytime” by Ahsan Avi on Unsplash
Time-lapse photography of people standing on the roadside and bridge during the day by Ahsan Avi on Unsplash
I made a mistake in my commit, how do I fix it? I made a mistake when submitting the code, how should I correct it?
My commit history is a mess, how do I make it neater? My code commit history is a mess, how do I keep it tidy?
If you have ever had the above questions, then this post is for you. This post covers a list of topics which will make you a Git expert. If you have ever had the above questions, then this article is for you. This article covers a range of topics that will make you a Git expert.
If you do not know Git basics, click here to check out my blog on Git basics. It is necessary that you know basics of Git to make the best use of this article. If you don’t know Git basics, please click here to view my Git basics blog. Understanding the basics of Git is necessary to get the most out of this article.
 “broken ceramic plate on floor” by chuttersnap on Unsplash
Broken ceramic plate on the floor by chuttersnap on Unsplash
“broken ceramic plate on floor” by chuttersnap on Unsplash
Broken ceramic plate on the floor by chuttersnap on Unsplash
Scenario 1 Scenario 1
Let’s say (assuming) that you have committed a bunch of files and realized that the commit message you entered is actually not clear. Now you want to change the commit message. In order to do this you can use git commit --amend
Let’s say you commit a bunch of files and realize that the commit message you entered isn’t actually clear. Now the commit message needs to be changed. In order to do this you can use git commit -amend
git commit --amend -m “New commit message”
Scenario 2 Scenario 2
Let’s say that you wanted to commit six files but, by mistake, you end up committing only five files. You may think that you can create a new commit and add the 6th file to that commit.
Let’s say you want to submit 6 files, but by mistake, you end up submitting only 5 files. You might think you could create a new commit and add a 6th file to that commit.
There is nothing wrong with this approach. But, to maintain a neat commit history, wouldn’t it be nicer if you could actually somehow add this file to your previous commit itself? This can be done through git commit --amend as well:
There is nothing wrong with this approach. However, in order to keep a tidy commit history, wouldn’t it be better if you could somehow add this file to the previous commit itself? This can be achieved with ’ git commit -amend ':
git add file6
git commit --amend --no-edit
--no-edit means that the commit message does not change.
Scenario 3 Scene 3
Whenever you do a commit in Git, the commit has an author name and author email tied to it. Generally, when you set up Git for the first time, you set up the author name and email. You don’t need to worry about the author details for every commit.
Whenever you perform a commit in Git, the commit has an author name and author email. Typically, when you first set up Git, you set up your author name and email. You don’t need to worry about author details for every submission.
That said, it’s possible that for a particular project you want to use a different email ID. You need to configure the email id for that project with the command: That said, you may want to use a different email ID for a specific project. You need to configure the email ID of the project using the following command:
git config user.email “your email id”
Let’s say that you forgot to configure the email and already did your first commit. Amend can be used to change the author of your previous commit as well. The author of the commit can be changed using the following command:
Let’s say you forgot to configure your email and you’ve already made your first commit. “Amend” can also be used to change the author of your previous submission. The author of a commit can be changed using:
git commit --amend --author "Author Name <Author Email>"
Point to note note
Use the amend command only in your local repository. Using amend for the remote repository can create a lot of confusion.
Only use the “amend” command in local repositories. Using amend with remote repositories can cause a lot of confusion.
My Commit history is a mess. How do I handle it? My commit history is a mess. How do I deal with it?
Let’s say that you are working on a piece of code. You know that the code is going to take approximately ten days to complete. Within those ten days, the other developers will also be committing code to the remote repository. Let’s say you’re working on a piece of code. You see, the code takes about 10 days to complete. During these ten days, other developers will also commit code to the remote repository.
It is a good practice to keep your local repository code up-to-date with the code in the remote repository. This avoids a lot of merge conflicts later when you raise a pull request. So you decide that you will pull the changes from the remote repository once every two days.It is a good practice to keep your local repository code up to date with the code in the remote repository. This avoids a lot of merge conflicts when making pull requests in the future. So you decide to pull changes from the remote repository every two days.
Every time you pull the code from the remote repository to the local repository a new merge commit is created in your local repository. This means that your local commit history is going to have a lot of merge commits which can make things look confusing to the reviewer. Every time code is pulled from the remote repository to the local repository, a new merge commit is created in the local repository. This means your local commit history will have a lot of merge commits, which will confuse reviewers.
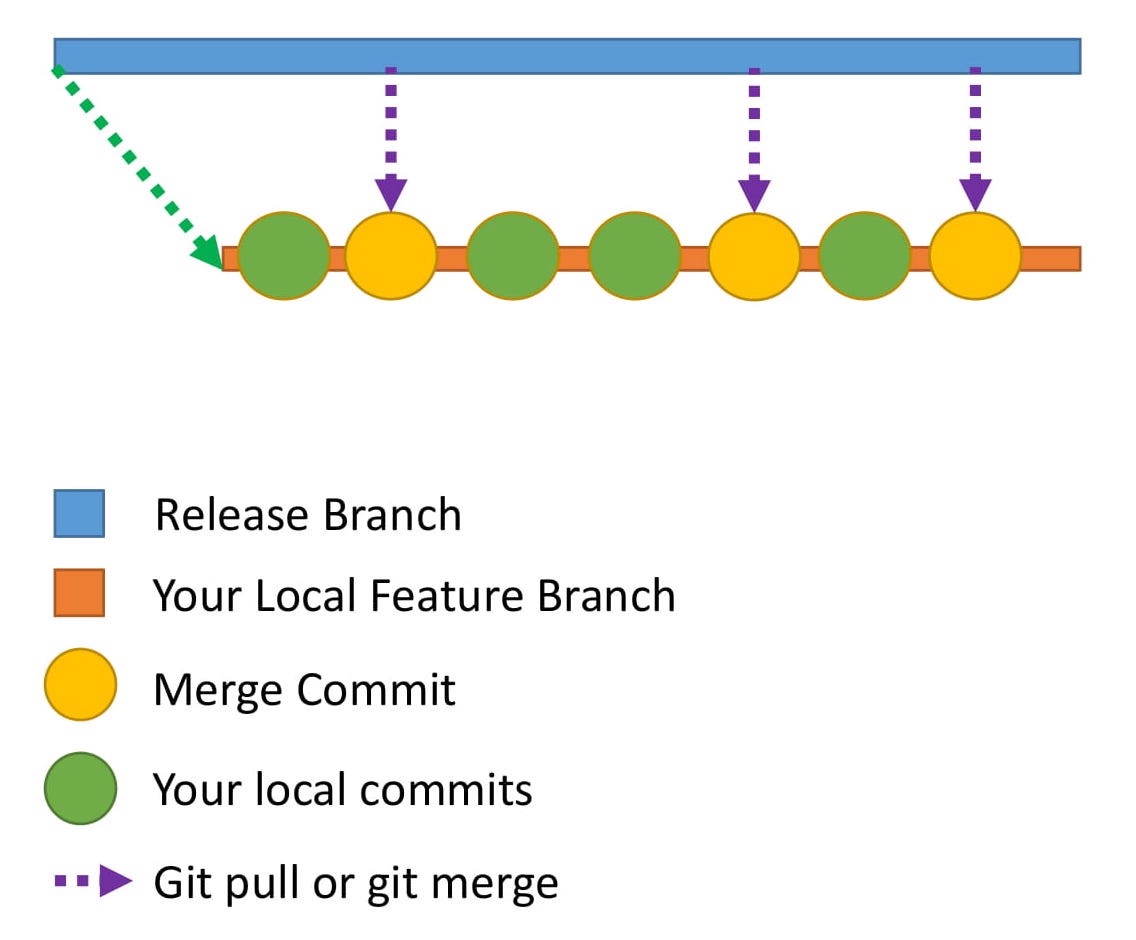 Here is how the commit history would look in your local repository.
Here’s what the commit history looks like in your local repository.
Here is how the commit history would look in your local repository.
Here’s what the commit history looks like in your local repository.
How do you make the commit history look neater? This is where rebase comes to the rescue. How can I make my commit history look cleaner? This is where rebase comes to the rescue.
What is rebasing? Let me explain this through an example.
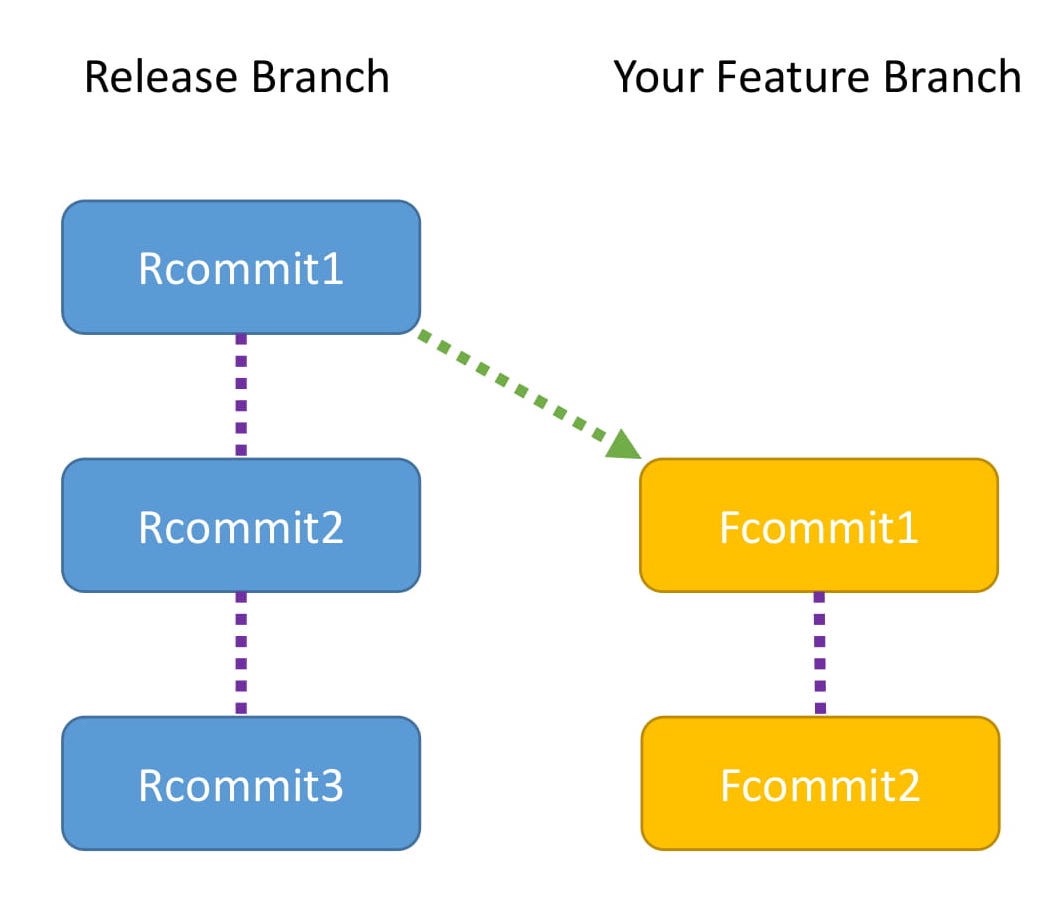 This diagram shows the commits in the release branch and your feature branch
- The Release branch has three commits: Rcommit1, Rcommit2, and Rcommit3.
- You created your Feature branch from the Release branch when it had only one commit, which is Rcommit1.
- You have added two commits to the Feature branch. They are Fcommit1 and Fcommit2.
- Your goal is to get the commits from the Release branch into your Feature branch.
- You are going to use rebase to do this.
- Let the name of the Release branch be release and the name of the Feature branch be feature.
- Rebasing can be done using the following commands:
This diagram shows commits in release branches and feature branches
- The Release branch has three commits: Rcommit1, Rcommit2 and Rcommit3.
- When the Release branch has only one commit (i.e. Rcommit1), you create the Feature branch from the release branch.
- You have added two commits to the Feature branch. They are Fcommit1 and Fcommit2.
- Your goal is to merge the commits from the Release branch into your Feature branch.
- You need to use rebase to do this.
- Let the name of the Release branch be release and the name of the Feature branch be feature.
- You can use the following command to rebasing:
git checkout feature
git rebase release
Rebasing
While rebasing, your goal is to ensure the Feature branch gets the latest code from the Release branch.
Rebasing tries to add each commit, one by one, and checks for conflicts. Does that sound confusing?
Let me explain with the help of a diagram.
This shows what rebasing actually does internally:
Rebase When rebasing, your goal is to ensure that the Feature branch gets the latest code from the Release branch.
rebase attempts to add each commit one by one and checks for conflicts. Sound confusing?
Let me explain it with a diagram.
This shows what rebase actually does internally:
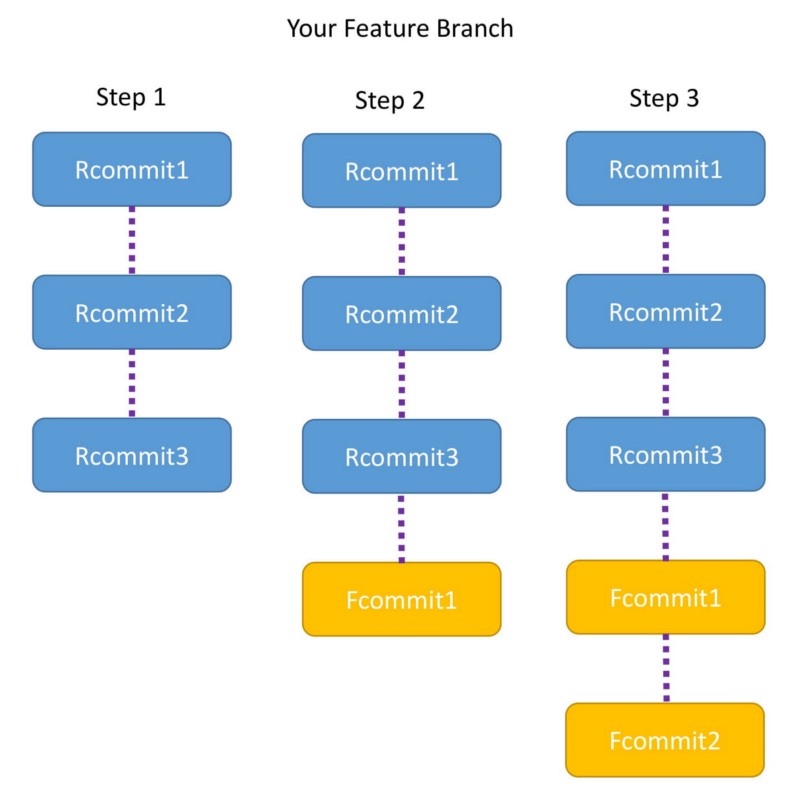
Step 1
- The moment you run the command, the Feature branch is pointed to the head of Release branch.
- Now the Feature branch has three commits: Rcommit1, Rcommit2, and Rcommit3.
- You may be wondering what happened to Fcommit1 and Fcommit2.
- The commits are still there and will be used in the steps below. Step 2
- Now Git tries to add Fcommit1 to the Feature branch.
- If there is no conflict Fcommit1 is added after Rcommit3
- If there is a conflict, Git will notify you, and you will have to resolve the conflict manually. Step 3
- Once Fcommit1 is added, Git will try to add Fcommit2.
- Again, if there is no conflict Fcommit2 is added after Fcommit1 and the rebase is successful.
- If there is a conflict, Git will notify you, and you will have to resolve it manually.
- After the entire rebase is done, you will notice that the Feature branch has Rcommit1, Rcommit2, Rcommit3, Fcommit1, and Fcommit2.
Step 1
- When running the command, the feature branch points to the head of the release branch.
- The feature branch now has three commits: Rcommit1, Rcommit2 and Rcommit3.
- You may be wondering what happened to Fcommit1 and Fcommit2.
- The commit still exists and will be used in the next steps. Step 2
- Now Git tries to add Fcommit1 to the feature branch.
- If there is no conflict, add Fcommit1 after Rcommit3
- If there is a conflict, Git will notify you and you must resolve the conflict manually. Step 3
- After adding Fcommit1, Git will try to add Fcommit2.
- Similarly, if there is no conflict after Fcommit1, add Fcommit2 after Fcommit1, and the rebase succeeds.
- If a conflict occurs, Git will notify you and you must resolve it manually.
- shown. After completing the entire rebase, you will notice that the Feature branches are Rcommit1, Rcommit2, Rcommit3, Fcommit1 and Fcommit2.
Points to note
- Both Rebase and Merge are useful in Git. One is not better than the other.
- In the case of a merge you will have a merge commit. In the case of a rebase there is no extra commit like a merge commit.
- One best practice is to use the commands at different points. Use rebase when you are updating your local code repository with the latest code from the remote repository. Use merge when you are dealing with pull requests to merge the Feature branch back with the Release or Master branch.
Note
- In Git, both Rebase and Merge are useful. One is not better than the other.
- In case of merge, you will have a merge commit. In case of rebase, there are no extra commits like merge commits.
- The best practice is to use different commands in different places. Use rebase when updating your local code repository with the latest code from the remote repository. When processing a pull request, use merge to merge the feature branch back to the release branch or master branch.
Congrats
You are now a Git expert 😃In this post you have learned about:
- amending commits
- rebase Both of these are very useful concepts. Go explore the world of Git to learn even more.
Congratulations
You are now a Git expert
In this article you learned:
*Modify and submit *Rebase Both concepts are useful. Go explore the world of Git and learn more.
About the author I love technology and follow the advancements in the field. I also like helping others with my technology knowledge.
Feel free to connect with me on my LinkedIn account https://www.linkedin.com/in/aditya1811/
You can also follow me on twitter https://twitter.com/adityasridhar18
Other Posts by Me An introduction to Git
TIPS:
How to use itms-services to install the ipa distribution server packaged with enterprise certificates
The process of setting up a server is relatively simple. You can use Baidu or Google yourself. I use nginx under Mac
The server I use is Mac Nginx. The configuration is very simple and there are many tutorials on the Internet. The key now is how to enable https.
After IOS7.1 system, if you want to use an enterprise certificate ($299) to install ipa online through itms-services, you must use https protocol.
nginx enables https configuration: https://www.jianshu.com/p/fe0fadb38600、
There is a restart step in the article just now: brew services restart nginx
It is recommended to enable the errorlog in the nginx configuration file, so that if there are errors during the startup process, you can view them directly. Some errors cannot be seen on the terminal. For example, when I use brew services restart nginx to restart, it prompts success.
Stopping `nginx`... (might take a while)
==> Successfully stopped `nginx` (label: homebrew.mxcl.nginx)
==> Successfully started `nginx` (label: homebrew.mxcl.nginx)
But it actually failed.
Later I saw in the errlog: bind() to 0.0.0.0:443 failed (13: Permission denied)
Need to use: sudo brew services restart nginx to start
There is a concept here that requires CA. Explanation of CA: https://www.cnblogs.com/handsomeBoys/p/6556336.html、https://www.jianshu.com/p/57066821b863 To put it simply, turning on https requires a certificate. This certificate needs to be applied to a third-party authoritative website, or you can build it yourself. Of course, https websites running online must be processed like third-party authoritative websites. Because self-built certificates require users to install them manually, and browsers do not trust them. There would be no point in https if anyone could create a certificate. But our current purpose is to use it on the company’s LAN, so we use a self-built certificate. The self-built certificate needs to be installed manually by the user.
The article below about the settings of itms-services is also very clear: http://www.cnblogs.com/feiyiban588/p/5788310.html https://blog.csdn.net/RazerTang/article/details/46898051/
You can also make a CA by following these steps:
Do your own CA
1. Introduction
Before, my blog supported https and used a one-year free certificate issued by StartCom CA. StartCom is a trusted CA. Its root certificate is trusted by various operating systems and browsers, so certificates issued by it will also be trusted.
I recently made an iOS ipa package upload and download program, which also requires the use of https links. I checked online and found that I can sign the certificate myself, so I put it into practice. Here are the detailed steps.
I particularly recommend the website below, which talks about it in…very detail.
https://jamielinux.com/docs/openssl-certificate-authority/index.html
There are some functions in the tutorial that you just need to understand, but we don’t need to use them, so I removed some of the steps to make them simpler and easier to use.
2. CA
When you act as a CA yourself, you use the openssl command to generate your own root certificate and let users install and trust it. Then all certificates signed with this root certificate can also be trusted.
So as a CA, we must first generate our own root certificate ca.cert.pem, and generating the root certificate requires ca.key.pem.
start Create the /root/ca folder. All CA operations will be performed in this folder.
 # mkdir /root/ca
    # cd /root/ca
    # mkdir certs crl newcerts private
    # chmod 700 private
    # touch index.txt
    # echo 1000 > serial
    # touch openssl.cnf
/root/ca: CA folder
/root/ca/certs: The location where the newly signed certificate and root certificate are stored
/root/ca/crl: Certificate request file storage location
/root/ca/newcerts: The location where the newly signed certificate is stored, which is a backup of /root/ca/certs
/root/ca/private: ca.key.pem storage location, don’t lose it
/root/ca/index.txt: Certificate signature record
/root/ca/serial: The serial number of the next certificate signature, saved to index.txt
Copy the following content to /root/ca/openssl.cnf
# OpenSSL root CA configuration file.
# Copy to `/root/ca/openssl.cnf`.

[ ca ]
# `man ca`
default_ca = CA_default

[ CA_default ]
# Directory and file locations.
dir               = /root/ca
certs             = $dir/certs
crl_dir           = $dir/crl
new_certs_dir     = $dir/newcerts
database          = $dir/index.txt
serial            = $dir/serial
RANDFILE          = $dir/private/.rand

# The root key and root certificate.
private_key       = $dir/private/ca.key.pem
certificate       = $dir/certs/ca.cert.pem

# For certificate revocation lists.
crlnumber         = $dir/crlnumber
crl               = $dir/crl/ca.crl.pem
crl_extensions    = crl_ext
default_crl_days  = 30

# SHA-1 is deprecated, so use SHA-2 instead.
default_md        = sha256

name_opt          = ca_default
cert_opt          = ca_default
default_days      = 3750
preserve          = no
policy            = policy_strict

[ policy_strict ]
# The root CA should only sign intermediate certificates that match.
# See the POLICY FORMAT section of `man ca`.
countryName             = match
stateOrProvinceName     = match
organizationName        = match
organizationalUnitName  = optional
commonName              = supplied
emailAddress            = optional

[ policy_loose ]
# Allow the intermediate CA to sign a more diverse range of certificates.
# See the POLICY FORMAT section of the `ca` man page.
countryName             = optional
stateOrProvinceName     = optional
localityName            = optional
organizationName        = optional
organizationalUnitName  = optional
commonName              = supplied
emailAddress            = optional

[ req ]
# Options for the `req` tool (`man req`).
default_bits        = 2048
distinguished_name  = req_distinguished_name
string_mask         = utf8only

# SHA-1 is deprecated, so use SHA-2 instead.
default_md          = sha256

# Extension to add when the -x509 option is used.
x509_extensions     = v3_ca

[ req_distinguished_name ]
# See <https://en.wikipedia.org/wiki/Certificate_signing_request>.
countryName                     = Country Name (2 letter code)
stateOrProvinceName             = State or Province Name
localityName                    = Locality Name
0.organizationName              = Organization Name
organizationalUnitName          = Organizational Unit Name
commonName                      = Common Name
emailAddress                    = Email Address

# Optionally, specify some defaults.
countryName_default             = CN
stateOrProvinceName_default     = JiangSu
localityName_default            = NanJing
0.organizationName_default      = SIYOU325
organizationalUnitName_default  = SIYOU325
emailAddress_default            = webmaster@siyou325.com

[ v3_ca ]
# Extensions for a typical CA (`man x509v3_config`).
subjectKeyIdentifier = hash
authorityKeyIdentifier = keyid:always,issuer
basicConstraints = critical, CA:true
keyUsage = critical, digitalSignature, cRLSign, keyCertSign

[ v3_intermediate_ca ]
# Extensions for a typical intermediate CA (`man x509v3_config`).
subjectKeyIdentifier = hash
authorityKeyIdentifier = keyid:always,issuer
basicConstraints = critical, CA:true, pathlen:0
keyUsage = critical, digitalSignature, cRLSign, keyCertSign

[ usr_cert ]
# Extensions for client certificates (`man x509v3_config`).
basicConstraints = CA:FALSE
nsCertType = client, email
nsComment = "OpenSSL Generated Client Certificate"
subjectKeyIdentifier = hash
authorityKeyIdentifier = keyid,issuer
keyUsage = critical, nonRepudiation, digitalSignature, keyEncipherment
extendedKeyUsage = clientAuth, emailProtection

[ server_cert ]
# Extensions for server certificates (`man x509v3_config`).
basicConstraints = CA:FALSE
nsCertType = server
nsComment = "OpenSSL Generated Server Certificate"
subjectKeyIdentifier = hash
authorityKeyIdentifier = keyid,issuer:always
keyUsage = critical, digitalSignature, keyEncipherment
extendedKeyUsage = serverAuth

[ crl_ext ]
# Extension for CRLs (`man x509v3_config`).
authorityKeyIdentifier=keyid:always

[ ocsp ]
# Extension for OCSP signing certificates (`man ocsp`).
basicConstraints = CA:FALSE
subjectKeyIdentifier = hash
authorityKeyIdentifier = keyid,issuer
keyUsage = critical, digitalSignature
extendedKeyUsage = critical, OCSPSigning
For a detailed explanation, you can see the link above (really recommended). Here I will pick out the important ones.
dir = /root/ca: This needs to be changed to the CA folder above
policy = policy_strict: Use the strict policy to sign the CA certificate
countryName_default = CN
0.organizationName_default = SIYOU325 CA
These two are the country and organization names, which will be displayed on the generated certificate. Simply sign a CA certificate. We only set these two values and leave the others empty.
[v3_ca]: This configuration is required to sign the CA certificate
[server_cert]: This is needed to sign the server certificate next
Generate root key
# cd /root/ca
# openssl genrsa -aes256 -out private/ca.key.pem 4096

输入两次密码siyou325123456,这个是很重要的密码,设置严格点。

# chmod 400 private/ca.key.pem
Generate root certificate
# cd /root/ca
# openssl req -config openssl.cnf \
      -key private/ca.key.pem \
      -new -x509 -days 7500 -sha256 -extensions v3_ca \
      -out certs/ca.cert.pem

根据提示输入key的密码:siyou325123456
然后一值回车下去,使用默认值

# chmod 444 certs/ca.cert.pem
-days 7300: Valid for 20 years
At this point, ca.key.pem (root key) and ca.cert.pem (root certificate) have been generated. The paths are as follows
/root/ca/private/ca.key.pem
/root/ca/certs/ca.cert.pem
At this point, the root certificate generation is completed.
The password of ca.key.pem is siyou325123456, which is very important and needs to be saved well.
ca.cert.pem is the root certificate. It needs to be sent to the user so that the user can install and trust it, so that all certificates we sign with this certificate can be trusted in the future.
3. Generate server certificate
The work of the CA role has been completed. Now we use the user role to generate a server certificate that can be used by tomcat and nginx.
Assume here that the domain name or IP address of our website is 127.0.0.1, then create the 127.0.0.1 folder in the directory of the same level as ca, and generate the server certificate in this directory.
# mkdir /root/127.0.0.1
# cd /root/127.0.0.1

# openssl genrsa -out server.key 2048
# openssl req -new -key server.key -out server.csr

会出现提示,简单点,除了下面几个,其他的都按回车就可以了。
Country Name输入:CN
Common Name输入域名或ip:127.0.0.1
A challenge password输入:server123456
openssl genrsa -out server.key 2048: 2048 after this command represents the number of encryption bits. Strictly use 4096. For example, the root certificate above uses this. Generally, 2048 and 1024 are sufficient. The larger the value, the longer the https link waiting time.
At this point, our server key (server.key) and certificate request (server.csr) are generated.
Next copy server.csr to ca/crl and rename it to 127.0.0.1.csr.pem
cp server.csr ../ca/crl/127.0.0.1.csr.pem
Then the role is switched to the CA role to process the request.
First modify /root/ca/openssl.cnf
policy            = policy_strict
改为
policy            = policy_loose
policy_strict is only used when generating a root certificate. At other times, just use the loose policy.
# cd /root/ca
# openssl ca -config openssl.cnf \
  -extensions server_cert -days 375 -notext -md sha256 \
  -in crl/127.0.0.1.csr.pem \
  -out certs/127.0.0.1.cert.pem
-days 375: Validity period is 375 days, the default value is also 375 days
At this time, you will find
There is an additional 127.0.0.1.cert.pem under /root/ca/certs (this is the generated certificate) There is an additional 1000.pem under newcerts (this is the certificate backup, 1000 is taken from the serial) /root/ca/index.txt has more lines
/root/ca/index.txt
V   171014020124Z       1000    unknown /C=CN/ST=Some-State/O=Internet Widgits Pty Ltd/CN=127.0.0.1
The value in /root/ca/serial +1 becomes 1001. Send the /root/ca/certs/127.0.0.1.cert.pem certificate to the user, and the work of the CA role is completed.
After switching the role back to the user, we copy the 127.0.0.1.cert.pem sent to us by the CA to the /root/127.0.0.1 directory and rename it to server.crt.
At this time we have the following three files in the directory
server.crt server.csr server.key
server.crt is the certificate we want. We can configure nginx to support https.
nginx configuration
server {
    listen       443;
    server_name  127.0.0.1;

    ssl on;
    ssl_certificate      /root/127.0.0.1/server.crt;
    ssl_certificate_key  /root/127.0.0.1/server.key;
    ssl_session_cache    shared:SSL:1m;
    ssl_session_timeout  10m;
    ssl_ciphers  HIGH:!aNULL:!MD5;
    ssl_prefer_server_ciphers  on;

    location / {
        proxy_pass   http://127.0.0.1;
    }

    location ~ ^(.*)\/\.svn\/ {
        deny all;
    }
}
To support tomcat, we also need to perform the following operations.
# cd /root/127.0.0.1
# openssl pkcs12 -export \
    -in server.crt \
    -inkey server.key \
    -out server.p12

输入两次密码:server123456

# keytool -importkeystore -v \
    -srckeystore  server.p12 \
    -srcstoretype pkcs12 \
    -srcstorepass server123456 \
    -destkeystore server.keystore \
    -deststoretype jks \
    -deststorepass server123456
File directory after operation
server.crt      server.csr      server.key
server.p12      server.keystore
tomcat configuration
<Connector SSLEnabled="true" clientAuth="false"
keystoreFile="/root/127.0.0.1/server.keystore"
keystorePass="server123456"
maxThreads="150" port="8443" protocol="org.apache.coyote.http11.Http11Protocol" scheme="https" secure="true" sslProtocol="TLS"/>
ending If we need to generate other server certificates in the future, we can just start from 3. Generating server certificates. Isn’t it very easy?
Reference:
https://jamielinux.com/docs/openssl-certificate-authority/index.html http://blog.csdn.net/RazerTang/article/details/46898051/ computer system https ca
Share:
1 You must not procrastinate when doing things. I originally planned to finish two arts this week, but I was busy with other things and could only write one.
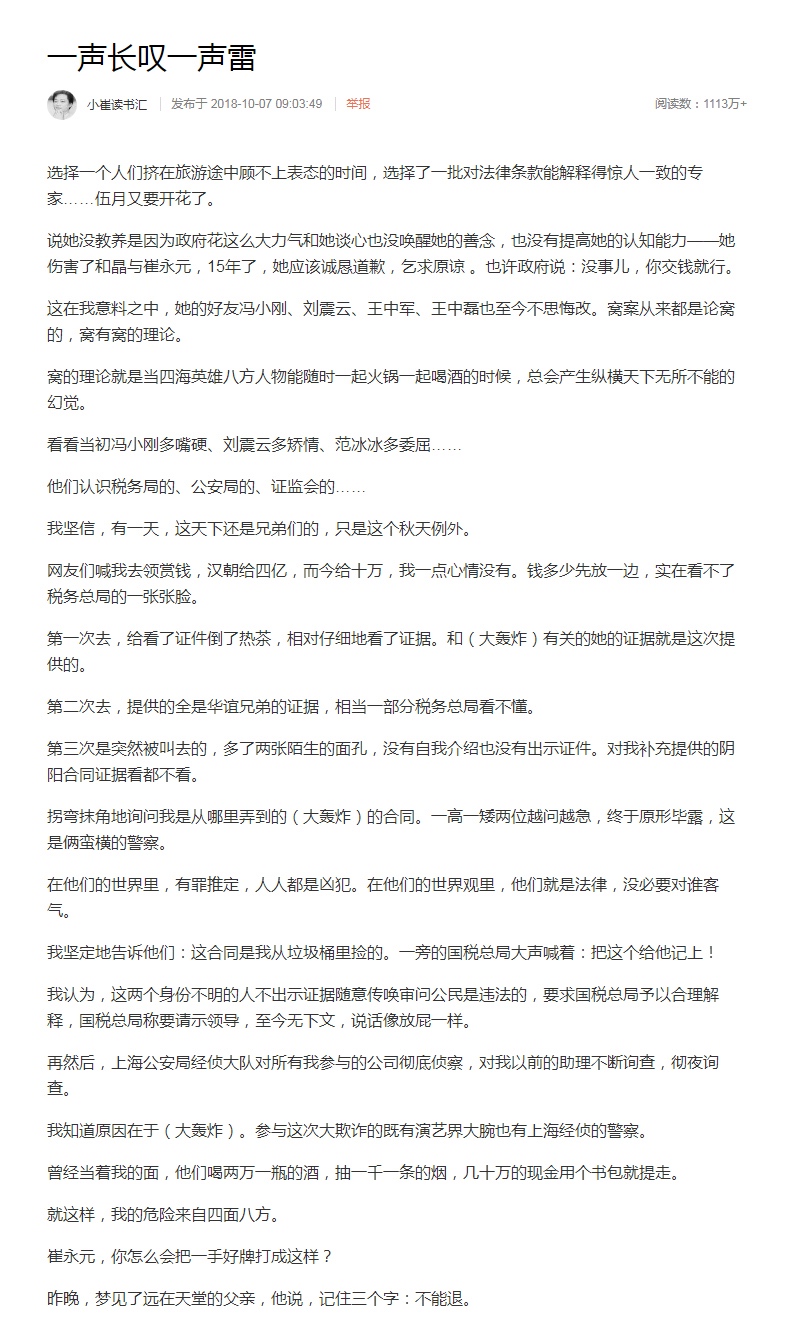
2 I really admire Cui Yongyuan. He first reported it to fbb, and then as shown below, Cui did something that many people wanted not to do, or things that they dared to do but couldn’t do. The consequence was that Cui was threatened with death. China lacks people like Cui. May Cui be safe.


What to read next
Want more posts about ARTS?
Posts in the same category are usually the best next step for reading more on this topic.
View same categoryWant to keep following #iOS?
Tags are useful for related tools, specific problems, and similar troubleshooting notes.
View same tagWant to explore another direction?
If you are not sure what to read next, return to the homepage and start from categories, topics, or latest updates.
Back home