ARTS #014
ARTS #014
ARTS is an activity initiated by
由左耳朵耗子--陈皓: Do at least one Leetcode algorithm question every week, read and comment on at least one English technical article, learn at least one technical skill, and share an article with opinions and thoughts. (That is, Algorithm, Review, Tip, and Share are referred to as ARTS) and persist for at least one year.
ARTS 014
This is article 14
Algorihm algorithm question
290. Word Pattern
Difficulty: Easy
Given a pattern and a string str, find if str follows the same pattern.
Here follow means a full match, such that there is a bijection between a letter in pattern and a non-empty word in str.
Example 1:
**Input:** pattern = `"abba"`, str = `"dog cat cat dog"`
**Output:** true```

**Example 2:**
**Input:**pattern = "abba", str = "dog cat cat fish"
Output: false```
Example 3:
**Input:** pattern = `"aaaa"`, str = `"dog cat cat dog"`
**Output:** false```

**Example 4:**
Input: pattern = "abba", str = "dog dog dog dog"
Output: false```
Notes:
You may assume pattern contains only lowercase letters, and str contains lowercase letters separated by a single space.
Solution
Language: C
When I first saw this algorithm, I felt that it could be solved with a dictionary, but there is no dictionary among the basic data types in C language, and I couldn’t think of a simple method, so I read a few answers, and then two days later, based on my own understanding, I implemented it again. The initial algorithm is as follows:
bool wordPattern0(char* pattern, char* str) {
    int str_len = strlen(str);
    int pattern_len = strlen(pattern);
    char buffer[str_len + 1];
    strcpy(buffer, str);

    char *s = strtok(buffer, " ");
    char *tables[26] ;
    memset(tables, '\0', 26 * sizeof(char *));
    int i =0;
    for (; s; s = strtok(NULL, " ")) {
        if (i>=pattern_len) {
            return false;
        }
        char aa = pattern[i];
        char *s1 = tables[aa - 'a'];

        if (!s1) {
            tables[aa - 'a'] = s;
        }
        else{
            if (strcmp(s, s1)) {
                 return false;
            }
        }
        i++;
    }

    if (i!=pattern_len) {
        return false;
    }
    return true;
}
After running it, I found that there are test cases that cannot be passed, such as: When char* pattern = “abba”; char* str = “dog dog dog dog”;
I originally thought that I had understood other people’s algorithms, but I still made mistakes when I implemented them. I still couldn’t get it right. I analyzed the reasons:
I read the question requirements again, and then I noticed that pattern and str should have a one-to-one relationship, and my implementation is a one-to-many relationship, and the dictionary is a one-to-many relationship, which means my implementation can only guarantee For the same letters in different positions of pattern, it can only be guaranteed that the words in the same position corresponding to str are also the same. For example, the first a in pattern corresponds to dog, and the fourth a should also correspond to dog. However, there is no guarantee that for the same word in different positions of str, there can only be one pattern character corresponding to it. The improved implementation is as follows:
bool wordPattern0(char* pattern, char* str) {
    int str_len = strlen(str);
    int pattern_len = strlen(pattern);
    char buffer[str_len + 1];
    strcpy(buffer, str);

    char *s = strtok(buffer, " ");
    char *tables[26] ;
    memset(tables, '\0', 26 * sizeof(char *));
    int i =0;
    for (; s; s = strtok(NULL, " ")) {
        if (i>=pattern_len) {
            return false;
        }
        char aa = pattern[i];
        char *s1 = tables[aa - 'a'];

        if (!s1) {
            tables[aa - 'a'] = s;
        }
        else{
            if (strcmp(s, s1)) {
                 return false;
            }
        }
        i++;
    }

    if (i!=pattern_len) {
        return false;
    }

    for (int i =0; i<26; i++) {
        if (!tables[i]) {
            continue;
        }
        for (int j =i+1; j<26; j++) {
            if (!tables[j]) {
                continue;
            }
            if (!strcmp(tables[i], tables[j])) {
                return false;
            }
        }
    }

    return true;
}
In fact, it is just adding a one-to-one corresponding judgment.
for (int i =0; i<26; i++) {
        if (!tables[i]) {
            continue;
        }
        for (int j =i+1; j<26; j++) {
            if (!tables[j]) {
                continue;
            }
            if (!strcmp(tables[i], tables[j])) {
                return false;
            }
        }
    }
The following implementations are worth learning:
Implementation 1, this is the first implementation I saw, so my implementation is very similar to it, but there are differences. This algorithm makes a judgment first before the words in str are added to the previous table. If the words in str already exist in the table, it returns false directly, while my implementation first adds the words in str to the table, and finally compares.
bool wordPattern(char* pattern, char* str) {
    int str_len = strlen(str);
    char buffer[str_len + 1];
    strcpy(buffer, str);

    char *p = pattern;
    char *s = strtok(buffer, " ");

    char *table[26];
    memset(table, '\0', 26 * sizeof(char *));

    do {
        if (*p == '\0') return false;
        int input = *p++ - 'a';

        if (table[input] == NULL) {
           ////加入table之前先判断table中是否已经存在,如果存在直接返回false
            for (int i = 0; i < 26; i++) {
                if (table[i] == NULL)
                    continue;
                if (strcmp(table[i], s) == 0)
                    return false;
            }

            table[input] = (char *) malloc((strlen(s) + 1) * sizeof(char));
            strcpy(table[input], s);
        } else {
            if (strcmp(table[input], s))
                return false;
        }

        s = strtok(NULL, " ");
    } while (s != NULL);

    for (int i = 0; i < 26; i++)
        free(table[i]);

    if (*p != '\0')
        return false;
    return true;
}
Implementation 2. This implementation is actually exactly the same as the previous algorithm. The difference is that the table is no longer filled with words in str, but hash values. Moreover, this hash algorithm is relatively simple, that is, converting words into integers.
bool wordPattern(char* pattern, char* str)
{
    unsigned int table[26] = {0};

    for (; *pattern && *str; pattern++) {
        unsigned int hash = 2139062143;

        for(; *str && *str != ' '; str++)
            hash = 37 * hash + *str;

        if (*str)
            str++;

        if (!table[*pattern - 'a']) {
          ////加入table之前先判断table中是否已经存在,如果存在直接返回false
            for (int i = 0; i < 26; ++i)
                if (table[i] == hash)
                    return false;
            table[*pattern - 'a'] = hash;
        } else
            if (table[*pattern - 'a'] != hash)
                return false;
    }

    return !*str && !*pattern;
}
Implementation 3, this implementation is a little more complicated, mainly because it does not use the strtok function and implements it by myself.
bool wordPattern2(char* pattern, char* str) {
    int patternLength = strlen(pattern);
    int tokens = 0;
    for (int i = 0; str[i] != 0; i++) {
        if (str[i] == ' ') {
            tokens++;
        }
    }
    tokens++;
    if (patternLength != tokens) {
        return false;
    }
    char *dict[26];
    for (int i = 0; i < 26; i++) {
        dict[i] = NULL;
    }
    for (int i = 0; pattern[i] != 0; i++) {
        int size = 0;
        int capacity = 8;
        char *ithTok = malloc(sizeof(char) * 8);
        int spacesToSkip = i;
        char *stringPointer = str;
        while (spacesToSkip) {
            if (*stringPointer == ' ') {
                spacesToSkip--;
            }
            stringPointer++;
        }
        //这个for循环相当于strtok函数,取出str中的单词
        for (int i = 0; stringPointer[i] != ' ' && stringPointer[i] != 0; i++) {
            ithTok[i] = stringPointer[i];
            size++;
            if (size >= capacity) {
                ithTok = realloc(ithTok, sizeof(char) * capacity * 2);
                capacity *= 2;
            }
        }

        //下面的判断和上面两个算法一样
        ithTok[size] = 0;
        if (dict[pattern[i] - 'a'] == NULL) {
           ////加入table之前先判断table中是否已经存在,如果存在直接返回false
            for (int j = 0; j < 26; j++) {
                if (dict[j] != NULL) {
                    if (strcmp(dict[j], ithTok) == 0) {
                        return false;
                    }
                }
            }
            dict[pattern[i] - 'a'] = ithTok;
        }
        else {
            if (strcmp(dict[pattern[i] - 'a'], ithTok) != 0) {
                return false;
            }
        }
    }
    return true;
}
Implementation 4: This implementation has never been clear to me. Although it can run successfully in LeetCode, I think there will be hash collision problems.
#define alphabetSIZE 26  //a~z 26 letters
#define hashtableSIZE 3533  //randomly choose a large prime number
struct Node{
    int count;
    char *str;
    struct Node *next;
};
void initialize_hashtable(struct Node *hashtable)
{
    int i;
    for(i=0;i<hashtableSIZE;i++)
    {
        hashtable[i].count = 0;
        hashtable[i].next = NULL;
    }
}

long hash (char *str)
{
    int c;
    unsigned long hash = 0;
    while(c = *str++)
        hash = (hash<<5) + hash + c;
    return hash%hashtableSIZE;
}

void hashtable_free(struct Node *hashtable)
{
    int i;
    for(i=0;i<hashtableSIZE;i++)
    {
        struct Node *tail = hashtable[i].next;
        while(tail)
        {
            struct Node *temp = tail;
            tail = tail->next;
            free(temp);
        }
    }
    free(hashtable);
}

bool wordPattern(char* pattern, char* str) {
    int alphabet[alphabetSIZE]={0},i,patternSize = strlen(pattern);
    struct Node *hashtable = (struct Node *)malloc(sizeof(struct Node)*hashtableSIZE);
    initialize_hashtable(hashtable);
    struct Node *node;
    char buffer[patternSize + 1];
    strcpy(buffer, str);
    char *word = strtok(buffer," ");
    for(i=0;word;i++)
    {
        if(i>=patternSize)    return 0;    // the number of word in str is more than the length of pattern
        node = &hashtable[hash(word)];

        if(alphabet[pattern[i]-'a'] != node->count)
            return 0;
        alphabet[pattern[i]-'a'] = node->count = i+1;
        word = strtok(NULL," ");
    }
    hashtable_free(hashtable);
    return i==patternSize?1:0;
}
Implementation 5: I have some time to be familiar with the following algorithm.
bool wordPattern4(char* pattern, char* str){
    bool follow = false;
    int sl = strlen(str);
    int pl = strlen(pattern);
    char c = ' ';
    char** strArray;
    int i = 0;
    int j = 0;
    int k = 0;
    int temp = 0;

    if ((pl==1)) return true;
    bool endofstr = false;
    strArray =  malloc(pl*sizeof(char*));

    for (j = 0; endofstr == false; j++){
        strArray[j] = malloc(10*sizeof(char));
        k = 0;
        while( i < sl){
            if (str[i]!=c)
                strArray[j][k] = str[i];
            else{
                strArray[j][k] = '\0';
                i++;
                break;
            }
            k++;
            i++;
        }
        if (i == sl) endofstr = true;
        printf("%d sub-string, %s\n", j, strArray[j]);
    }

    //    for (i = 0; i <= j; i++){
    //        printf("%d:%s\n",i,strArray[i]);
    //    }

    if (pl != j) return false;

    for (i = 0; i < pl-1; i++){
        for (k = i+1; k < pl; k++){

            temp = strcmp(strArray[i], strArray[k]);
            if ((pattern[i] == pattern[k]) && !temp)
                follow = true;
            else if ((pattern[i] != pattern[k]) && temp)
                follow = true;
            else
                return false;
        }
    }
    return follow;
}
Review
This article comes from https://medium.com/@JimmyMAndersson/ios-development-and-the-wrong-kind-of-mvc-4e3e2decb82e, The first part of this article talks about how to use the MVC design pattern in iOS development, but then it talks about inheritance. The quality of the blog is average.
iOS Development and the Wrong Kind of MVC
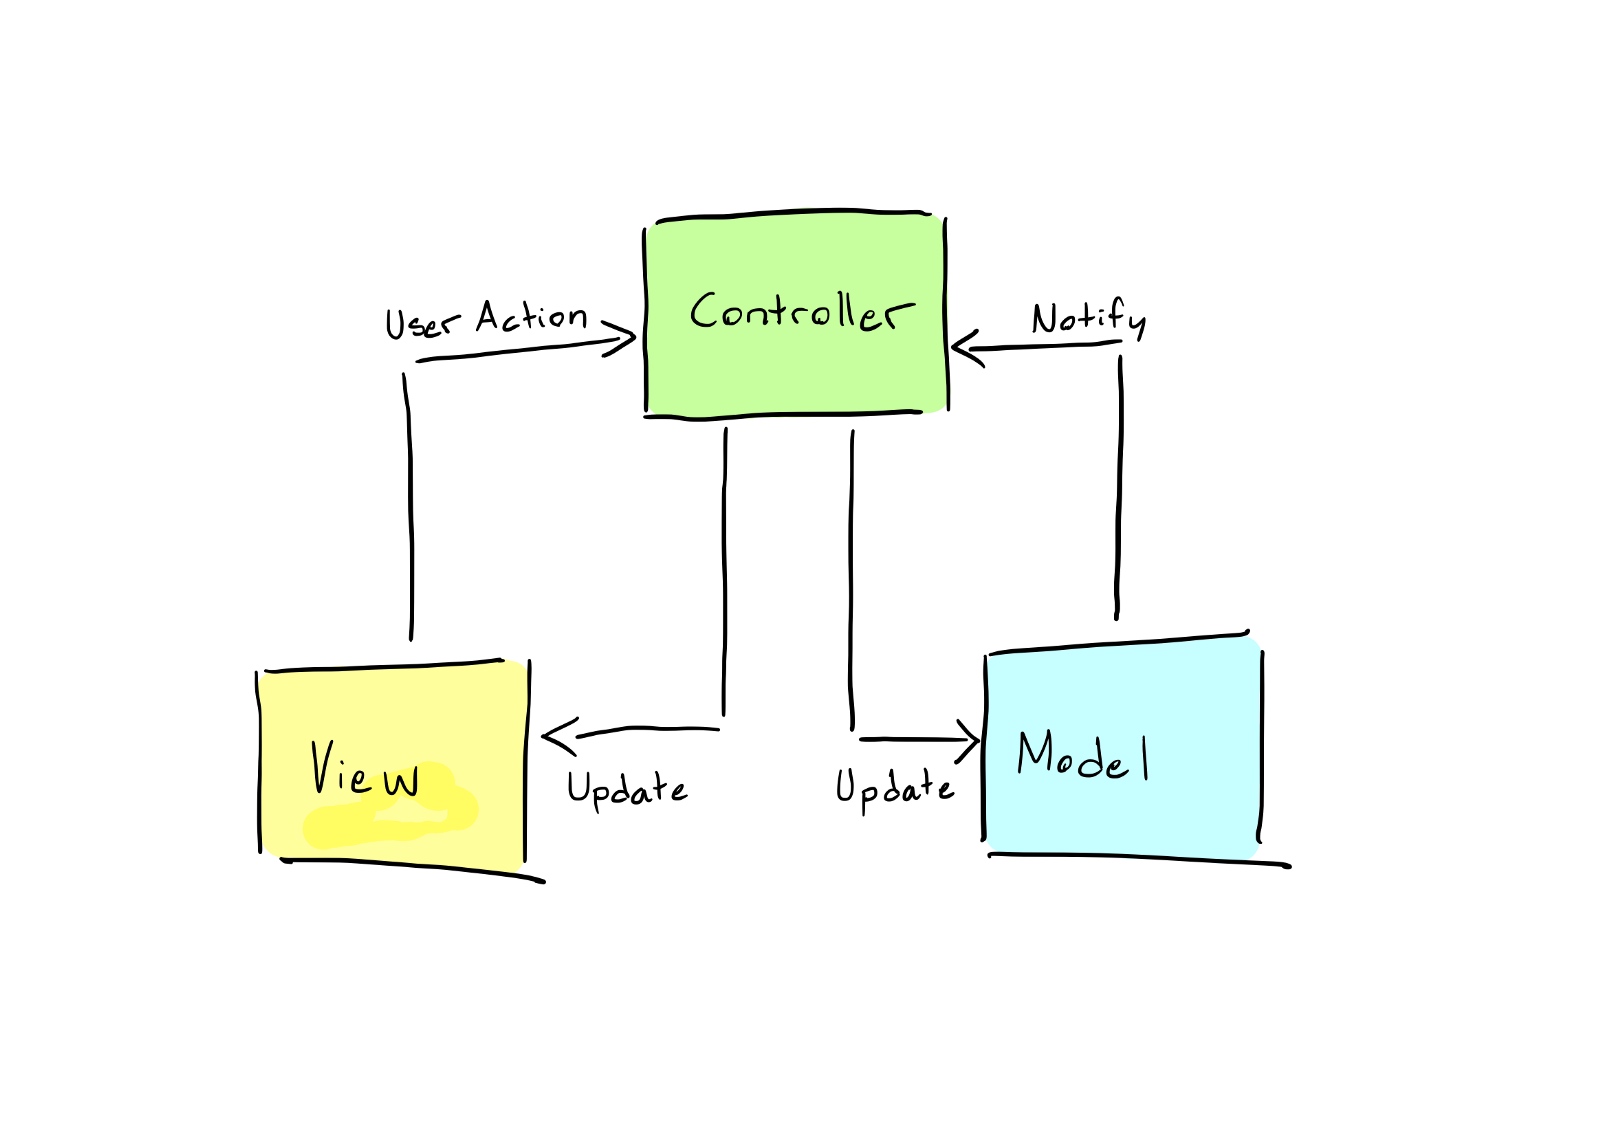
When starting out as an iOS Developer, you get to hear a lot about the MVC (Model-View-Controller) Pattern and how it’s the best when developing mobile applications. The MVC Pattern is a good way to think about certain problems when it comes to developing applications with a graphical user interface. It provides you with a way of thinking that lets you split your code into manageable packages, where each package will handle its own problem domain.
When you start out as an iOS developer, you’ll hear a lot about the MVC (Model-View-Controller) pattern and how it’s best when developing mobile apps. The MVC pattern is a good way to think about certain issues when developing applications with a graphical user interface. It gives you a way of thinking that allows you to split your code into manageable packages, where each package will handle its own problem domain.
What are these packages you’re talking about?
There are three different conceptual packages in MVC that are supposed to handle problems like so: There are three different concept packages in MVC that should handle problems like this:
Model: The Model package handles what developers call The Business Logic. What The Business Logic is, depends on your particular application, but you can loosely generalize it to mean “the stuff in your application that manages your data and keeps it up to date and accurate”. This means that it’s the Models job to keep track of the position of your game characters, to know how many times you’ve played a song on iTunes, to save your edited photos to a format that you can share on social media… The Model is what makes your application smart.
Model packages handle what developers call business logic. What business logic is depends on your specific application, but you can loosely summarize it as “what’s in your application that manages the data and keeps it current and accurate.” This means its models work to track your game character’s location, know how many times you’ve played a song on iTunes, save edited photos in a format you can share on social media… models that make your apps smarter. .
View: The View in an MVC application will represent data that is sent from the Model and display it to the user. A View is supposed to be “dumb”, meaning that it should only know how to draw or display the data that it receives but should never make any adjustments to it or even be aware of what kind of data it is.
The view in an MVC application will represent the data sent from the model and display it to the user. The view should be “dumb”, meaning it should only know how to draw or display the data it receives, but should not make any adjustments to it, or even know what type of data it is.Controller: The Controller package is what makes an app fun to use. It’s responsible for interpreting the taps, presses, clicks, and tilts of your device, and send them off to make updates to the Model or the View. The Controller should be “thin”, meaning that it should just interpret the input and pass the appropriate signal along to the right place, in order for the application to make adjustments according to what the user expects. When information flows between the Model and the View, the Controller will act as a link. Controller packages make applications fun to use. It is responsible for interpreting clicks, presses, clicks, and tilts of the device and sending them to the model or view for updates. The controller should be “thin,” meaning it should interpret input and deliver the appropriate signals to the right places so that the application adjusts to the user’s expectations. Controllers act as links when information flows between the model and the view.
So, what about iOS and “the wrong kind of MVC”? So, what about iOS and “wrong MVC”? When developing for iOS, the Model-View-Controller Pattern will often take the form of a MassiveViewController Pattern. When developing for iOS, the Model-View-Controller pattern often takes the form of the MassiveViewController pattern. Take a look at this example of a Controller class.
import UIKit

class MassiveViewController: UIViewController {

  private var stackView: UIStackView = {
    let stack = UIStackView()
    stack.translatesAutoresizingMaskIntoConstraints = false
    stack.axis = .vertical
    stack.alignment = .center
    stack.distribution = .fillProportionally
    return stack
  }()

  private var photoView = UIImageView(image: UIImage(named: "SomeImage"))

  private var descriptionLabel: UILabel = {
    let label = UILabel()
    label.textColor = .black
    label.text = "Descriptive text"
    return label
  }()

  override func viewDidLoad() {
    super.viewDidLoad()
    self.stackView.addArrangedSubview(self.photoView)
    self.stackView.addArrangedSubview(self.descriptionLabel)
    self.view.addSubview(self.stackView)

    self.stackView.topAnchor.constraint(equalTo: self.view.safeAreaLayoutGuide.topAnchor).isActive = true
    self.stackView.bottomAnchor.constraint(equalTo: self.view.safeAreaLayoutGuide.bottomAnchor).isActive = true
    self.stackView.leadingAnchor.constraint(equalTo: self.view.safeAreaLayoutGuide.leadingAnchor).isActive = true
    self.stackView.trailingAnchor.constraint(equalTo: self.view.safeAreaLayoutGuide.trailingAnchor).isActive = true

    let photoTapRecognizer = UITapGestureRecognizer(target: self, action: #selector(handlePhotoViewTap(_:)))
    self.photoView.addGestureRecognizer(photoTapRecognizer)

    let labelTapRecognizer = UITapGestureRecognizer(target: self, action: #selector(handleDescriptionLabelTap(_:)))
    self.descriptionLabel.addGestureRecognizer(labelTapRecognizer)
  }

  @objc private func handlePhotoViewTap(_ sender: UITapGestureRecognizer) {
    // Do something mind blowing
  }

  @objc private func handleDescriptionLabelTap(_ sender: UITapGestureRecognizer) {
    // Do some other cool thing
  }
}
MassiveViewController.swift
I’m sure this looks familiar and that you may have written something like this, I know I have. So what is the problem here? I’m sure this looks familiar, you’ve probably written something like this, I know I have. So what’s the problem?
The problem with this file is that it does not separate concerns. It is not adopting the MVC Pattern, and therefore the class gets massive and will be very hard to maintain if we make changes to the application in the future. The problem with this document is that it does not separate concerns. It does not follow the MVC pattern, so the classes become very large and will be difficult to maintain if we make changes to the application in the future.
Looking at the code, you can see that this is supposed to be a Controller class, yet it takes on responsibilities of the View as well, setting up visual elements that are only there to display data to the user. Looking at the code, you can see that this should be a Controller class, but it also takes on the responsibility of the view, setting up visual elements that are used only to display data to the user.
How do we improve it?
class PlainMVCView: UIView {

  private var stackView: UIStackView = {
    let stack = UIStackView()
    stack.translatesAutoresizingMaskIntoConstraints = false
    stack.axis = .vertical
    stack.alignment = .center
    stack.distribution = .fillProportionally
    return stack
  }()

  private var photoView = UIImageView(image: UIImage(named: "SomeImage"))

  private var descriptionLabel: UILabel = {
    let label = UILabel()
    label.textColor = .black
    label.text = "Descriptive text"
    return label
  }()

  override init(frame: CGRect) {
    super.init(frame: frame)
    setupView()
  }

  required init?(coder aDecoder: NSCoder) {
    super.init(coder: aDecoder)
    setupView()
  }

  private func setupView() {
    self.stackView.addArrangedSubview(self.photoView)
    self.stackView.addArrangedSubview(self.descriptionLabel)
    self.addSubview(self.stackView)

    self.stackView.topAnchor.constraint(equalTo: self.safeAreaLayoutGuide.topAnchor).isActive = true
    self.stackView.bottomAnchor.constraint(equalTo: self.safeAreaLayoutGuide.bottomAnchor).isActive = true
    self.stackView.leadingAnchor.constraint(equalTo: self.safeAreaLayoutGuide.leadingAnchor).isActive = true
    self.stackView.trailingAnchor.constraint(equalTo: self.safeAreaLayoutGuide.trailingAnchor).isActive = true
  }

  public func addPhotoViewGestureRecognizer(_ recognizer: UIGestureRecognizer) {
    self.photoView.addGestureRecognizer(recognizer)
  }

  public func addDescriptionLabelGestureRecognizer(_ recognizer: UIGestureRecognizer) {
    self.descriptionLabel.addGestureRecognizer(recognizer)
  }
}
PlainMVCView.swift
class PlainMVCViewController: UIViewController {

  override func loadView() {
    self.view = PlainMVCView()
  }

  override func viewDidLoad() {
    let photoTapRecognizer = UITapGestureRecognizer(target: self, action: #selector(handlePhotoViewTap(_:)))
    // This will work for now, because we know the specific type of the view.
    // However, force casting should be avoided in general. More on that in the next example.
    (self.view as! PlainMVCView).addPhotoViewGestureRecognizer(photoTapRecognizer)

    let labelTapRecognizer = UITapGestureRecognizer(target: self, action: #selector(handleDescriptionLabelTap(_:)))
    (self.view as! PlainMVCView).addDescriptionLabelGestureRecognizer(labelTapRecognizer)
  }

  @objc private func handlePhotoViewTap(_ sender: UITapGestureRecognizer) {
    // Do something mind blowing
  }

  @objc private func handleDescriptionLabelTap(_ sender: UITapGestureRecognizer) {
    // Do something a little less mind blowing, but still cool
  }
}
PlainMVCViewController.swift
Above is the same code, but split up into chunks that correspond to a single MVC responsibility. Note that the Controller class shrunk a fair bit. However, the View class is almost the same size as the original file was. So what did we really win? This is the tricky part about MVC, because if you need to write more code, it may not always seem like you’re getting something out of it. Above is the same code, but split into chunks that correspond to individual MVC responsibilities. Notice that the controller class is shrunk a bit. However, the size of the view class is almost the same as the size of the original file. So what exactly did we win? This is the trickier part of MVC because if you need to write more code it may not always look like you got anything out of it.
By refactoring the code like this, it will adhere to the Separation of Concerns Principle. The Controller class only deals with Controller problems and is, apart from initializing the corresponding View object, completely separated from everything that is related to displaying stuff to the user. This will be a valuable feature as the application grows, because one day you may want to replace a Controller class with a new, better one. If the Controller is separated from the View, that means less work for you and the likelihood of bugs and errors decrease. Also note that we defined two methods in our View to aid Controllers who may want to listen to tap events on either of the “interesting” parts of the view, as not to violate Law of Demeter. By refactoring the code this way, it will adhere to the separation of concerns principle. The controller class only handles controller issues and is completely separate from everything related to displaying content to the user, except initializing the corresponding view object. This will be a valuable feature as your application grows, as one day you may want to replace the controller class with a new, better controller class. If the controller is decoupled from the view, you have less work to do and the likelihood of bugs and errors is reduced. Also note that we defined two methods in the view to help controllers who may want to listen to events in the “interesting” parts of the view to avoid violating the Law of Demeter.
Is that it?
Well, if we move away from the pure MVC aspect of it, you can see that our Controller class is depending very heavily on a single implementation of a View class. This goes against the principles of extensibility and coupling, so let’s try to fix that with some generics and abstractions.
Well, if we leave the pure MVC side of it, you can see that our controller class relies heavily on a single implementation of a view class. This goes against the principles of extensibility and coupling, so let’s try to fix it with some generics and abstractions.
    protocol Controller {
associatedtype ViewType
var currentView: ViewType { get }
}

class BaseViewController<ViewType: UIView>: UIViewController, Controller {

override func loadView() {
  self.view = ViewType()
}

var currentView: ViewType {
  /*
   Because of how we implemented loadView(), this cast should never fail.
   However, linters and such tools may complain if we force cast and we want
   to be good developers, so we perform Optional binding just to be safe.
   */
  if let view = self.view as? ViewType {
    return view
  } else {
    let view = ViewType()
    self.view = view
    return view
  }
}
}
BaseController.swift
protocol View {
func setupView()
}

class BaseView: UIView, View {

override init(frame: CGRect) {
  super.init(frame: frame)
  setupView()
}

required init?(coder aDecoder: NSCoder) {
  super.init(coder: aDecoder)
  setupView()
}

func setupView() {
  // Use this method to do any set up that is shared between all your views,
  // for example drawing backgrounds, etc.
}
}

BaseView.swift
@objc protocol MVCViewActionDelegate: AnyObject {
func photoViewWasTapped()
func descriptionLabelWasTapped()
}

class MVCView: BaseView {

private var stackView: UIStackView = {
  let stack = UIStackView()
  stack.translatesAutoresizingMaskIntoConstraints = false
  stack.axis = .vertical
  stack.alignment = .center
  stack.distribution = .fillProportionally
  return stack
}()

private var photoView = UIImageView(image: UIImage(named: "SomeImage"))

private var descriptionLabel: UILabel = {
  let label = UILabel()
  label.textColor = .black
  label.text = "Descriptive text"
  return label
}()

public weak var actionDelegate: MVCViewActionDelegate?

override func setupView() {
  super.setupView()

  self.stackView.addArrangedSubview(self.photoView)
  self.stackView.addArrangedSubview(self.descriptionLabel)
  self.addSubview(self.stackView)

  self.stackView.topAnchor.constraint(equalTo: self.safeAreaLayoutGuide.topAnchor).isActive = true
  self.stackView.bottomAnchor.constraint(equalTo: self.safeAreaLayoutGuide.bottomAnchor).isActive = true
  self.stackView.leadingAnchor.constraint(equalTo: self.safeAreaLayoutGuide.leadingAnchor).isActive = true
  self.stackView.trailingAnchor.constraint(equalTo: self.safeAreaLayoutGuide.trailingAnchor).isActive = true

  let photoTapEvent = UITapGestureRecognizer(target: self.actionDelegate, action: #selector(MVCViewActionDelegate.photoViewWasTapped))
  self.photoView.addGestureRecognizer(photoTapEvent)

  let labelTapEvent = UITapGestureRecognizer(target: self.actionDelegate, action: #selector(MVCViewActionDelegate.descriptionLabelWasTapped))
  self.descriptionLabel.addGestureRecognizer(labelTapEvent)
}
}

MVCView.swift
class MVCViewController: BaseViewController<MVCView>, MVCViewActionDelegate {

override func viewDidLoad() {
  super.viewDidLoad()
  self.currentView.actionDelegate = self
}

func photoViewWasTapped() {
  // Do some mind blowing stuff
}

func descriptionLabelWasTapped() {
  // Do some other cool junk
}
}
MVCViewController.swift
Now we’ve got 4 files all of a sudden (7 files, if you separate the protocols into their own files). Is this really necessary?? Now we suddenly have 4 files (7 files if you separate the protocols into their own files). Is this really necessary??What happened here is that we abstracted away any possible common behavior of both Controller and View classes, and put them into a Base class. The base class is not really meant to be initialized on its own, but defines and provides common operations and flows that every subclass will share. What’s happening here is that we abstract away any possible public behavior from the controller and view classes and put them into a base class. The base class is not actually intended to initialize itself, but rather defines and provides common operations and flows that every subclass will share.
This means that all future Controller and View subclasses will be smaller, easier to read, and easier to maintain as you won’t have to duplicate all the shared behavior. You will thank the stars if you decide to, for example, change the background image of all views. Instead of changing the same line in 20 classes, you will only have to change it in the one Base class. Easy! This means that all future controller and view subclasses will be smaller, easier to read, and easier to maintain because you don’t have to duplicate all shared behavior. For example, if you decide to change the background image of all views, you’ll thank the stars. No need to change the same line in 20 classes, just in one base class. Simple!
This also means that if you want to change what kind of View class is associated with a certain Controller, it will be much less work. Since we adopted the MVCViewActionDelegate protocol, switching out the View class will be as easy as changing the class name in the generic constraint, and implement the new action delegate methods (if there are any accompanying the new View). This also means that if you want to change the type of view class associated with a certain controller, you have much less work. Because we have adopted the MVCViewActionDelegate protocol, switching view classes is as simple as changing the class name in a generic constraint and implementing the new action delegate method (if the new view comes with any actions).
Hopefully, the way to think about MVC when developing your iOS applications has become a little less daunting and a little more clear after reading this. Feel free to comment if you have questions, and follow to get notifications about future articles. Hopefully after reading this article, the approach to thinking about MVC when developing iOS applications becomes less daunting and more clear. If you have any questions, please feel free to leave a comment and stay tuned for future articles.
Tips
imgView.contentMode = UIViewContentModeScaleAspectFill; If you set this property, set imgView.clipsToBounds = YES; otherwise, if the picture is inappropriate, it will go out of view.
I recently made a request to set a picture for UIImageView. The size of UIImageView is 375X88 or 375X64, and the size of the picture is 1000X400. It is required that the width of the picture cannot be intercepted, and the height can only be intercepted from the top of the picture. I completed it with my own screenshot. The implementation method is as follows:
    CGFloat height =  UIImageView.height / (UIImageView.width) * image.size.width;
    CGImageRef imageRef = image.CGImage;
    CGImageRef imageRefRect = CGImageCreateWithImageInRect(imageRef, CGRectMake(0, image.size.height - height, image.size.width, height));
    UIImage *newImage = [[UIImage alloc] initWithCGImage:imageRefRect];
    CGImageRelease(imageRefRect);
    UIImageView.image = newImage;
So can this requirement be fulfilled using UIImageView’s contentMode? Although this model has been used before, it has not been summarized. I will take this opportunity to summarize it: Test demo: https://github.com/dandan2009/UIImageViewContentMode
- (void)viewDidLoad {
[super viewDidLoad];
// Do any additional setup after loading the view, typically from a nib.
//最近做了个需求,给UIImageView的设置图片,UIImageView的大小是375X88或375X64,图片的大小是1000X400,要求图片宽度不能截取,高度只能截取图片的顶部,我是用自己截图完成的,实现方法如下的:
// 伪代码 image就是图片
// CGFloat height = UIImageView.height / (UIImageView.width) * image.size.width;
// CGImageRef imageRef = image.CGImage;
// CGImageRef imageRefRect = CGImageCreateWithImageInRect(imageRef, CGRectMake(0, image.size.height - height, image.size.width, height));
// UIImage *newImage = [[UIImage alloc] initWithCGImage:imageRefRect];
// CGImageRelease(imageRefRect);
// UIImageView.image = newImage;
// 那么用UIImageView的contentMode 能不能完成这个需求呢?虽然这个模式之前也用过,但是没有总结过,趁着这个机会总结一下
UIScrollView *scrollView = [[UIScrollView alloc] init];
scrollView.frame = self.view.bounds;
scrollView.backgroundColor = [UIColor greenColor];
scrollView.contentSize = CGSizeMake(self.view.frame.size.width, 1200);
[self.view addSubview:scrollView];
UIImage *iconImage = [UIImage imageNamed:@"icon"];
CGFloat imageWidth = iconImage.size.width;
CGFloat imageheight = iconImage.size.height;
UILabel *lab = [[UILabel alloc] initWithFrame:CGRectMake(10, 30, 370, 20)];
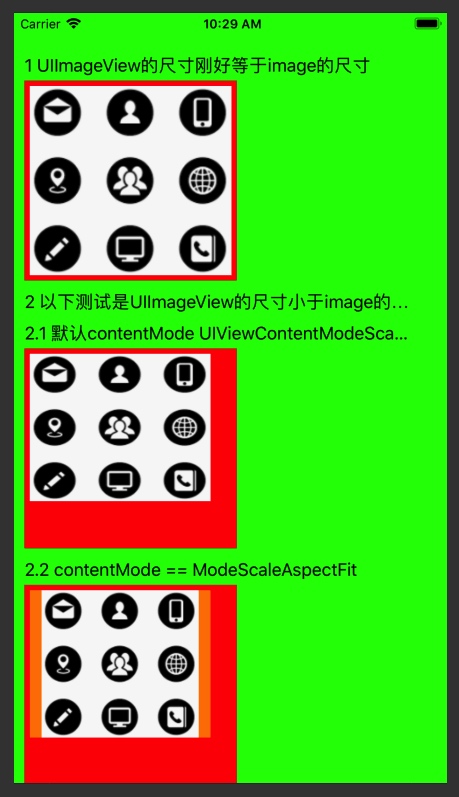
lab.text = @"1 UIImageView的尺寸刚好等于image的尺寸";
[scrollView addSubview:lab];
UIView *base1 = [[UIView alloc] initWithFrame:CGRectMake(lab.left, lab.bottom + 5, imageWidth + 10, imageheight + 10)];
base1.backgroundColor = [UIColor redColor];
[scrollView addSubview:base1];
UIImageView *imageView1 = [[UIImageView alloc] initWithFrame:CGRectMake(5, 5, imageWidth , imageheight )];
imageView1.image = iconImage;
imageView1.backgroundColor = [UIColor orangeColor];
[base1 addSubview:imageView1];
UILabel *labsec1 = [[UILabel alloc] initWithFrame:CGRectMake(base1.left, base1.bottom + 10, 370, 20)];
labsec1.text = @"2 以下测试是UIImageView的尺寸小于image的尺寸";
[scrollView addSubview:labsec1];
/// 默认contentMode UIViewContentModeScaleToFill
// 可以看到这个是把图片的拉伸或压缩,使图片的大小刚好等于imageview的大小
UILabel *lab2 = [[UILabel alloc] initWithFrame:CGRectMake(labsec1.left, labsec1.bottom + 10, 370, 20)];
lab2.text = @"2.1 默认contentMode UIViewContentModeScaleToFill";
[scrollView addSubview:lab2];
UIView *base2 = [[UIView alloc] initWithFrame:CGRectMake(lab2.left, lab2.bottom + 5, imageWidth + 10, imageheight + 10)];
base2.backgroundColor = [UIColor redColor];
[scrollView addSubview:base2];
UIImageView *imageView2 = [[UIImageView alloc] initWithFrame:CGRectMake(5, 5, imageWidth-20 , imageheight-40 )];
imageView2.backgroundColor = [UIColor orangeColor];
imageView2.image = iconImage;
[base2 addSubview:imageView2];
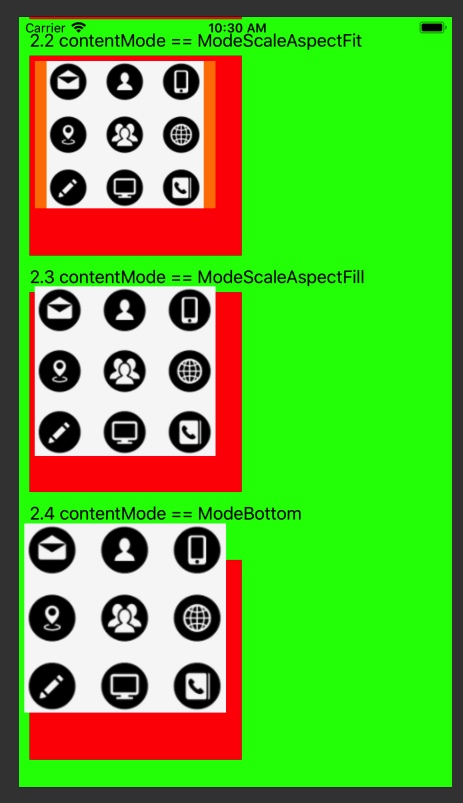
///ModeScaleAspectFit 图片在不超出UIImageView的情况下,保证图片不变形,就有可能导致UIImageView不被image冲满,有空白留出
UILabel *lab3 = [[UILabel alloc] initWithFrame:CGRectMake(base2.left, base2.bottom + 10, 370, 20)];
lab3.text = @"2.2 contentMode == ModeScaleAspectFit";
[scrollView addSubview:lab3];
UIView *base3 = [[UIView alloc] initWithFrame:CGRectMake(lab3.left, lab3.bottom + 5, imageWidth + 10, imageheight + 10)];
base3.backgroundColor = [UIColor redColor];
[scrollView addSubview:base3];
UIImageView *imageView3 = [[UIImageView alloc] initWithFrame:CGRectMake(5, 5, imageWidth-20 , imageheight-40 )];
imageView3.contentMode = UIViewContentModeScaleAspectFit;
imageView3.image = iconImage;
imageView3.backgroundColor = [UIColor orangeColor];
[base3 addSubview:imageView3];
/// ModeScaleAspectFill 图片在保证UIImageView被填满的情况下 ,保证图片不变形,就有可能导致image超出UIImageView
UILabel *lab4 = [[UILabel alloc] initWithFrame:CGRectMake(base3.left, base3.bottom + 10, 370, 20)];
lab4.text = @"2.3 contentMode == ModeScaleAspectFill";
[scrollView addSubview:lab4];
UIView *base4 = [[UIView alloc] initWithFrame:CGRectMake(lab4.left, lab4.bottom + 5, imageWidth + 10, imageheight + 10)];
base4.backgroundColor = [UIColor redColor];
[scrollView addSubview:base4];
UIImageView *imageView4 = [[UIImageView alloc] initWithFrame:CGRectMake(5, 5, imageWidth-20 , imageheight-40 )];
imageView4.backgroundColor = [UIColor orangeColor];
imageView4.contentMode = UIViewContentModeScaleAspectFill;
imageView4.image = iconImage;
[base4 addSubview:imageView4];
//ModeBottom 图片在保证UIImageView被填满, 且UIImageView底部不被超出的情况下,image按自己的实际大小完全展示,有可能导致image超出UIImageView
UILabel *lab5 = [[UILabel alloc] initWithFrame:CGRectMake(base4.left, base4.bottom + 10, 370, 20)];
lab5.text = @"2.4 contentMode == ModeBottom";
[scrollView addSubview:lab5];
UIView *base5 = [[UIView alloc] initWithFrame:CGRectMake(lab5.left, lab5.bottom + 35, imageWidth + 10, imageheight + 10)];
base5.backgroundColor = [UIColor redColor];
[scrollView addSubview:base5];
UIImageView *imageView5 = [[UIImageView alloc] initWithFrame:CGRectMake(5, 5, imageWidth-20 , imageheight-40 )];
imageView5.backgroundColor = [UIColor orangeColor];
imageView5.contentMode = UIViewContentModeBottom;
imageView5.image = iconImage;
[base5 addSubview:imageView5];
}
Share
Summarize the feeling of doing algorithm questions:
Last week, I worked on an algorithm question for almost a day, but I didn’t get it done. I just kept scratching at it. The efficiency was really low, so in the future, I would take up to half an hour to solve a question. If I couldn’t solve it, I would look at other people’s implementations, and then implement it again myself. This week I followed this routine.
Why didn’t I solve this question this week?
- Not familiar with the basic knowledge of C language and the corresponding libraries, such as strcpy, strtok, strcmp 2 But I still practice too little and do too little. I still need to read more books.
I thought I had understood other people’s algorithms, but I still made mistakes when I implemented them myself, so I must practice!
Now that there are more and more questions in LeetCode, it is almost impossible to finish them all. What should I do? I think it can be like this: Classify the questions, do a few of each type of questions first, and then summarize the thinking direction for solving such questions. You can do a few questions every week according to your own situation. Anyway, you cannot use brute force or deadlock. You must return to the original intention of training the way of thinking. One question takes half an hour 1 If you can’t figure out how to do it in 0 minutes, just look at other people’s ideas, implement it yourself, and then look at other people’s excellent answers. While doing the questions, you should quickly complete some basic algorithms (such as sorting, search, binary trees, graphs, etc.) and read algorithm books.
What to read next
Want more posts about ARTS?
Posts in the same category are usually the best next step for reading more on this topic.
View same categoryWant to keep following #iOS?
Tags are useful for related tools, specific problems, and similar troubleshooting notes.
View same tagWant to explore another direction?
If you are not sure what to read next, return to the homepage and start from categories, topics, or latest updates.
Back home